Skip to product information
1 of 1

KLVRco

AR Maglock KingPin ONLY

AR Maglock KingPin ONLY

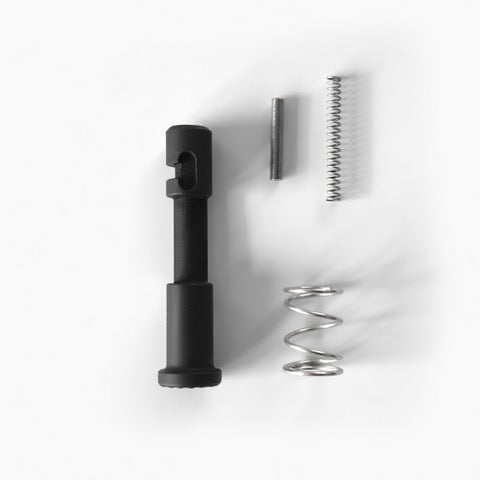
The Legendary Rear Takedown Pin that made all of this possible.  If you only need the Kingpin and already have a Gen 2 AR Maglock then you can order this.  Comes with everything shown in the picture


40.00

View full details

INSTALLATION GUIDE FOR HELLFIGHTER PAL

1. Treat Every Firearm as if It Is Loaded

2. Always Keep the Muzzle Pointed in a Safe Direction

3. Be Sure of Your Target and Aware of What Is Beyond 

4. Keep Your Finger Outside of the Trigger Guard Until You Are Ready to Shoot

Please make sure firearm is unloaded and barrel and chamber are clear of any live ammunition and loaded magazines.

Before proceeding we suggest that you consult a licensed gunsmith for installation.

INSTALLING YOUR JT HELLFIGHTER PAL

- You will need to remove your rear takedown pin detent and spring

- Remove upper receiver from lower and prepare all parts as shown in image

STEP 1

With Magazine catch installed on lower receiver place long skinny spring on magazine catch

STEP 2

Place magazine button with screw holes facing up on top of spring

STEP 3

Place small spring inside magazine button

STEP 4

Place barrel nut into magazine button

STEP 5

Tighten barrel nut until it is about 1/8" from the top of the magazine catch stem. This will be adjusted later

We suggest some blue loctite or teflon tape on the magazine catch to prevent the barrel nut from backing out.

DO NOT use any permanent locking agent as the barrel nut must be adjustable.

STEP 6

Place the PAL arm on top of magazine button and loosely install one screw as shown

STEP 7

Remove original Hellfighter spring and replace with the medium spring

STEP 8

With upper receiver installed insert the Hellfighter pin as shown from the left side of the receiver.

NOTE: This is reversed from the normal installation of a Hellfighter pin

STEP 9

Place the Hellfighter pin through the PAL arm noting that the detent channel of the Hellfighter should be at the 12:00 position. There is a small semi circle piece inside the hole that indexes into the Hellfighter detent channel.

STEP 10

Push the arm down on top of the Hellfighter pin making sure the semi circle part is indexed into the detent channel.

Install the Hellfighter cap screw and tighten until the indexing pin is covered by the cap screw.

DO NOT TIGHTEN THE CAP SCREW ALL THE WAY DOWN

STEP 11

Depress the left side of the Hellfighter and ensure that the receiver opens and closes as normal. If it doesn't tighten or loosen the cap screw until it does.

STEP 12

Remove the small screw holding the arm to the magazine button.

Hover the arm above the button and insert a magazine and test for function.

If the receiver doesnt open and magazine doesnt release proceed to STEP 13

STEP 13

Because the barrel nut touching the PAL arm inside the magazine button is what releases the magazine the barrel nut will need to be either tightened or loosened in MINOR increments until you achieve proper function. You may also have to adjust the Hellfighter cap screw as well to dial in the timing to ensure that the upper receiver opens first.

STEP 14

Once you have checked function install the small screws into the magazine button and lock down the PAL arm.

DO NOT OVERTIGHTEN. The system may work better even if the two small screws are set a little loose.

If the PAL doesn't release the magazine once the system is assembled go back to STEP 13 and make minor adjustments to the barrel nut as needed and reassemble.

To uninstall and diassemble your firearm reverse steps above.